Merry Christmas

Taken on the steps of the Boston Public Library, this is the statue, "Science," which, along with "Art," stradles the library's entrance.
Taken on the steps of the Boston Public Library, this is the statue, "Science," which, along with "Art," stradles the library's entrance.
Looking inbound. Christmas can't last forever and neither can my fascination with Christmas lights.
There is still very little to report from the gardening front. The last bit of rosemary was harvested and dried. The sedum finally petered out early in November, but have already set the beginnings of what will be impressive growth in the spring.
In the meantime, enjoy this picture I took in my neighborhood last night.
With a few cold nights telegraphing winter's impending arrival, there are fewer and fewer items to write about. A few mums aside, most everything is dormant. As such, until spring, my substantive posts will taper off in favor of pictures. I hope you enjoy and keep checking back -- just don't be dissapointed in the lack of new content.
The Management.
(Incidentally, this photo was taken this morning as temperatures were in the upper 20s.)
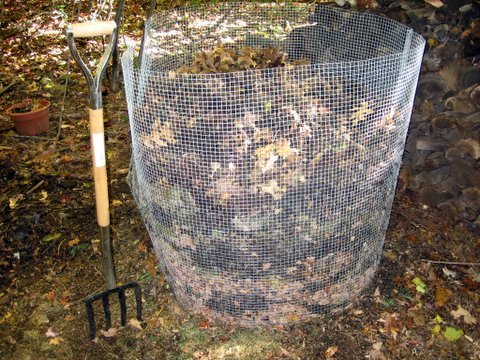 Even a modest yard can be innundated with leaves in the height of autumn. With more or more municipalities placing restrictions on yard waste collection, disposal of leaves can be a real hassle. While oak leaves tend to mat and break down slowly, most leaves are well-suited for composted. If a fistful of leaves crunches and breaks apart, it'll be good for compost.
Dead, brown leaves are relatively high in carbon (C:N 60:1) and will require a good amount of greens to provide some nitrogen to speed decomposition. If it's not too late in the season, grass clippings should fit the bill. My town's recycling center is a gold mine for getting clippings. I like to kick it there ands covet my neighbors' lawn clippings.
Incidentally, the garden fork in the picture is my new favorite tool. It's perfect for turning compost, digging holes in rocky soil, and scaring teenage hooligans.
Extra credit reading assignment: wonderful article on how composting does its thing.

An otherwise uninteresting plant during the spring and summer, euonymus alatus also known as a burning bush gradually turns from green to a brilliant red with orange-hued berries. A common plant, especially when one is atuned to spot it, euonymous alatus is considered by many to be an invasive species. Recently, Botany Photo of the Day profiled the rather similar euonymus europeanus.
Thoughts of invasion notwithstanding, this plant grows at a fast clip, around 13 to 24 inches per year. It is a an easy plant to maintain as it tolerates a wide range of soil conditions and enjoys everything between full shade to full sun. Come winter, feel free to hack away as this euonymous tolerates heavy pruning. It'll still love you come April.
 This ilex meservae ("Blue Princess") went into the ground last week. It is a remarkably hardy plant, withstanding temperatures as low as -30 F, and tolerating a range of conditions from shady to sunny and from wet to dry. These traits combined with its relatively quick growing habits should help establish this as a great foundation plant. To help these plants along, a small amount of Holly-Tone was scrathed in to the soil around the plant.
Also known as a Blue Holly, this plant is a hybrid of a hardy Japanese Holly with a more traditional looking English Holly. Not suprisingly, to get these red berries to set on female plants, a male plant needs to be within several hundred feet. It is best to plant at least one male along with several females. Both male and female should be of the same variety to ensure that both sexes are in bloom at the same time.
Brush, trimmings, and grass clippings piled up in my yard and it became clear that I needed to compost. The only thing stopping me was the cost. Unbelievably, composting bins cost around $75-$100. That seems like a lot of money to spend on a something that essentially holds garbage.
Luckily, plans for bins abound on the internet. Here's how I did it. A good bin should 1) hold about 3'x3'x3' of waste, 2) be easy to move, 3) have plenty of ventilation, 4) and be easy to open so that you can scoop out your compost. There might be some other important characteristics but this seems to hit the highlights.
Items:
2 rolls of 36" by 5' galvanized hardware cloth. Home Depot sells this stuff. It's usually in the fencing aisle (way down near lumber) and it looks like really sturdy chicken wire. It comes in rolls of 5' and 25'. 25' seems like overkill. We'll just "sew" our two 5' together. Also, don't get chicken wire. Although it is a bit cheaper you'll probably have to put stakes in the ground for support. That's a pain. Also, shoot for the 1/2" hardware cloth. 1/2" denotes the size of the holes.
1 small roll of 18 or 20 gauge wire. You may not even need this. My hardware cloth was bound with wire already, which can be used to fasten the rolls together.
Tools:
Needle nose pliers. Try to use a pair with a wire cutter built in, which most will have.
Gloves. The ends of the hardware cloth are sharp. Wear a sturdy pair of gloves.
Step One: Roll out both rolls of hardware cloth.
Step Two: Carefully fold back the unfinished edges so that nothing pointy sticks out. Note that the hardware cloth has a finished edge and an unfinished edge.
Step Three: Align the two recently folded edges and tie them together with wire. Put ties every couple of inches. We want this be sturdy. Wire it down firmly.
Step Four. Prop it out so that it now looks like a bin.
Step Five. Stitch the two other edges together loosely. This should be firm but relatively easy to undo when you want to move the pile or really get at your compost. (You might just want to wire it firmly anyway and simply lift the whole bin up instead of opening it.)
This should just about do it. It's no engineering marvel but it gets the job done for about $12. Pictures to follow.
These mushrooms, which I think are Lycoperdon pyriforme, were on the side of steeply sloped bank under a canopy of oak trees located in the Hunnewell Town Forest in Natick, Massachusetts. There were a few large clumps about a foot or two wide.
 For those who've wondered just what a sucker looks like, gawk at this photo. This is a tomato plant sucker. As you can see, it's a new stem growing between two pre-existing, and more established, stems. Some people like to pinch them back. Others don't. But before you even have to make that decision, here's what you need to look for. This is a determinate variety of tomato, so I think I'll keep the suckers on and see what happens.
 The garlic chives are in bloom this week. Last year the plant didn't flower at all. Here's a neat rule of thumb I found on garden web, which explains this plant's relatively slow growth. The rule with perennials: first year they sleep, second year they creep, third year they LEAP.
 Despite being nearly devoured by vermin, the lettuce has come roaring back. We just might get a salad out of these plants after all. We'll need to harvest the lettuce quickly because it will turn bitter in the heat.
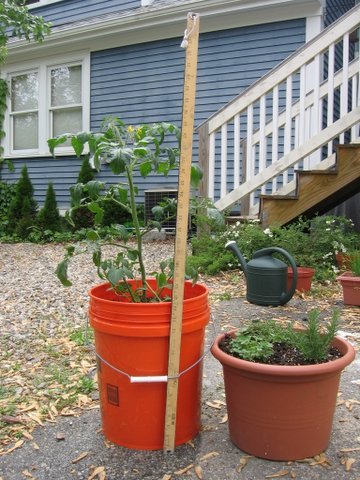
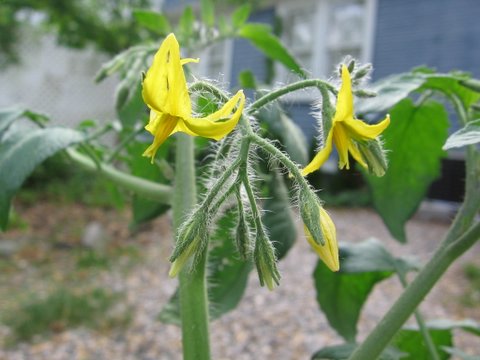 Warm weather and bright sunshine ushered in lots of new growth and even brought out a few flowers. As you'll see the plant grew quite a bit. So long as the temperatures remain below 90 during the day and below 70 at night, tomato plants will set fruit. Virginia's cooperative extension has a great page on tomato culture, which explains fruit set more. Apparently, optimal fruit set happens when nighttime temperatures are in the 60s.
 Last year we focused on vegetables but, given the uncertain future of the grange, this year we're concentrating on smaller projects, like these herbs. Planted in this container are rosemary (Rosmarinus officinalis), oregano (Origanum vulgare?), and woolly thyme (Thymus psuedolanuginosus). This type of thyme isn't edible but should fill in (and hopefully not crowd out) between the other herbs. All of the herbs are perennial, so I just might be able to keep them going until next year if they overwinter indoors. Here's a good link to a herb page maintained by NC State.
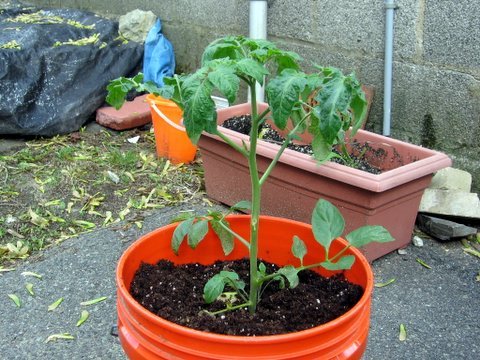 Record-setting rainfall, cold temperatures, and high winds have characterized the past three weeks on the grange. These aren't the conditions that get tomato plants growing. As a result, this plant has grown very slowly since being planted last month. After ten or eleven straight days of rain, it appeared that it would never come back.
So much for getting a jump on the season.
Conditions are to set improve later this week with temperatures forecast to hit 80F over the weekend. That should really help this guy along.
 While I don't think I've actually seen a yeti, though I may have on the red line somewhere between Park Street and Charles, I still like to believe it exists. Similarly, while I've never seen a rabbit or analagous mammal in my slice of the urban jungle, I pretend that they have a lair somewhere, perhaps deep in the sewer.
They do exist and I have proof. They must or else my neighbors have lost all maner of decorum. On Friday night something ravaged my lettuce, felling it in its prime. The damage: one plant completely uprooted, two plants mauled. Bunch of animals in this neighborhood.
Many days of rain on the grange will be followed by more even more rain and perhaps a touch of small-stream flooding for excitement. Despite the rainy weather, the lettuce is doing well, but the tomato plant has more or less stopped growing. Tomatoes apparently require warm weather. So much for my plan to get a jump on the season. With several inches of rain predicted for the weekend, the tomtato has been moved under the see-through acrylic patio table. That'll learn it.


Despite my landlord's inexorable march toward transforming my gardening space into full-time parking, the Frange defiantly welcomed its first tomato plant of the season. Oddly named a Grape Sweet Olive Tomato, this was one of the only tomato plants available at the nursery. It's way too early for tomatoes in New England, but the idea is that if the plant is brought indoors on cold nights, it will be able to get a jump on the traditional Memorial Day weekend starting time for tomatoes. Until things heat up, and evening temperatures begin to stay above the mid-40s, the plant will repair back to the warmth of my kitchen every night.
UPDATE: This plant performed quite well in a container. While not as prolific as other varieties, it was a solid producer. The fruit wasn't quite as olive shaped as expected, but they were'nt perfectly round, either. The flavor of the tomatoes was generally good but not spectacular. All in all, it tasted like a regular cherry tomato bought at a megamart. It didn't have the extra sweetness of other varieties like Super Sweet 100s.

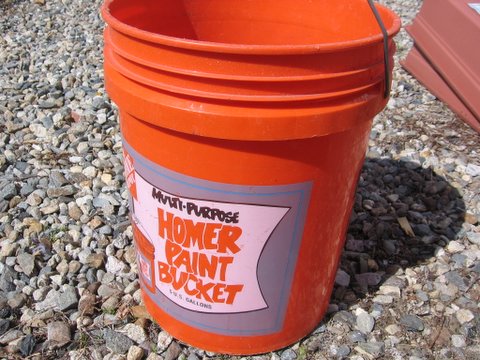 As pizza is to a pizzeria, containers are an essential part of any container garden. My favorite container is the standard five gallon utility bucket, which can be found at just about any hardware store for only a few bucks. They are incredibly durable but extremely ugly. It's a cruel tradeoff. Before using, be sure to drill a bunch of holes in the bottom, otherwise water won't be able to drain out. A drill seems like the easiest way to do this. I've heard of people heating screw drivers to punch holes.
  That's dumb. Get a drill and do your work over a sheet of newspaper so that the carved out plastic doesn't go everywhere.
 These garlic chives are very hardy. They survived the entire winter outside and then began sending up new growth in mid to late Februrary. Started from seed sometime last June, they've become quite rootbound. They are so packed in that water slips right through the container. This is a perfect time to divide this plant.
Having never done this before, I improvised and used a bit of commonsense as my guide. After wetting down the root system, I used a trowel to divide the plant into quaters. Without a doubt, I was tearing apart roots, but this is a resilient plant and it should transplant nicely.
Once the plant was divided up I rounded up several sizes of containers. It's hard to say just how deep of a container this plant needs, so it'll be interesting to see how it does in a range of sizes. Mixing together old soil from last year with some new stuff, the chives were set flush with the new soil line. Finally, I mixed up some Miracle Gro and gave them a good watering.

![]()